The average serrated knife doesn’t get much action in the kitchen. Mostly it is used for special cooking projects and is forgotten after that. The reason they stay sharp for so long is that they are barely used and because of its unique serrated design.
When people think of a serrated knife, ordinarily bread knives come to mind. The interesting fact you might not know is that there are others like the serrated utility knife that you might not know are available on the market.
Have you ever tried to sharpen your serrated knife? For most people, the answer is no which is why I think it was important to write this post about how to sharpen a serrated knife.
The typical serrated knife is capable of slicing through solid covers. The serrations on the cutting end tend to go right through the hard surface and clutches onto it.

Serrated Knives Function Well Even When Not Sharpened
Something most people don’t know is that the serrated knife is the only knife in your kitchen that can perform when dull.
The reason lies behind the arrangement of the blade. The drawback to this is that it is often ignored when knife sharpening time comes around.
The edge of the serrated knife gets its strength to slice from a few determinants.
The long ends of the serrations touch the food initially, allowing those points to put more weight than if the same weight was placed using a knife with a regular blade. Piercing becomes much easier to do because of this feature.
On another note, the serrations are pounded in with a chisel which makes them much flatter.
What most people don’t know is that chisel-grounding occurs when one side of the blade gets sharpened at a different angle. It is usually around 25 degrees, and the other side is just flat.
For this reason, serrated knives can be used for other tasks other than slicing bread.
Once you realize this, your life will change, and you will be able to do some amazing things in the kitchen. I like to use a serrated knife with hard-skinned fruit like melons.
You can also try using it citrus fruits, soft cakes, and apples. The less you use the knives that require constant sharpening and use a serrated knife, the more time you save in the long run.
A good friend of mine prefers to slice his tomatoes with a serrated knife. I think it’s a splendid idea because your typical chef knife has a smooth blade that smushes the soft skin of a tomato.
A serrated knife, on the other hand, will slice right through it with very little effort.
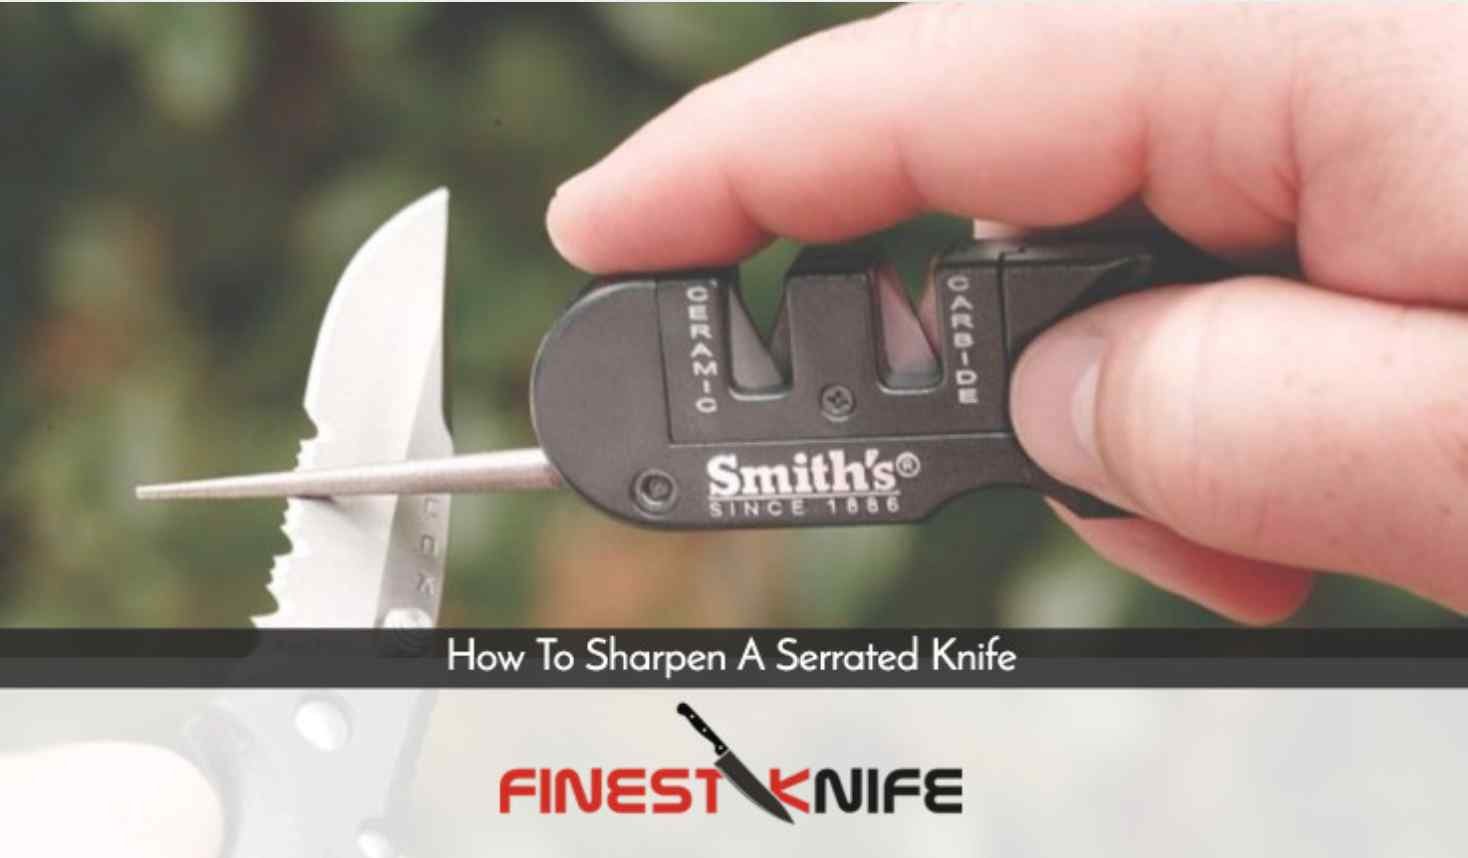
If you want to sharpen your serrated knife, you will need a unique sharpener. It is meant for serrated knives and helps sharpen each serration individually.
The easiest way would be to buy an electric knife sharpener because you get the job done with little effort on your end. However, if you prefer to do it the old-fashioned way, the guide below will teach you how.
Steps on How to Sharpen a Serrated Knife
- Step 1: Learning how to sharpen serrated knives is simple. first step is to go with a serrated knife sharpener that comes with an appropriate grit size that will accommodate the job you need to accomplish. Grit sizes can be anywhere from extra fine, fine, ceramic, coarse or medium. I like to go with the fine grit because it gives me a solid slicing edge that can sharpen at an acceptable standard. Most knives will do just fine with this size. The grit size that I consider to be optional is the coarse grit. If your knives are super dull and you are in a rush, this is the one you should consider for the task. Lastly, polished edges are possible with an extra-fine-grit, but I barely use this one because sharpness is more important to me. People who are a perfectionist and want to get their knives perfectly sharpened can go with multiple grit sizes. They typically go from coarse to medium and use the fine sharpener to finish it off.
- Step 2: The second step involves pairing the cone width of the sharpener to the dimension of the serration. The width of the sharpener broadens at the center and decreases as it continues to be equal with the serrations.
- Step 3: The third step is pushing quick, front and backward strokes to sharpen each unique serration of the knife’s edge. Continue this for at least a minute, touch around for a burr on the backbone of the knife. If you can feel the first burr entirely, then you can continue to the other serrations of your knife. Most people don’t understand the importance of the burr. It is critical because it helps you know whether you are sharpening your knife correctly and in the right areas. Lastly, you will start to see that the old steel is being removed to make way for a fresher surface underneath it.
- Step 4: Remember, if you want to learn how to sharpen a bread knife, you will have to take these exact steps because it has a serrated blade also. Before you start this last step, please look over your knife and ensure that the serrations are properly sharpened. Once you have confirmed this, overturn the knife and softly grind the burr of your knife with light movements.
Conclusion
By now, you should have a sharp knife that is ready to slice and chop everything in its way. Always remember that this knife can do much more than slice bread.
Experiment with it and you will see the wonder that lies ahead of you and you will never have to ask “how do you sharpen a serrated knife?” again.
Leave a Reply